'%3e%3cpath%20d='M13.8669%2010.1279L15.3088%2015.2933C15.3088%2015.2933%2029.8503%2017.1577%2030.4946%2026.8467C30.4946%2026.8161%2037.3051%2017.7385%2013.8669%2010.1279Z'%20fill='%23175CCA'/%3e%3cpath%20d='M12.7009%2010.0366C12.7009%2010.0366%2014.1735%202.12041%2019.2047%206.36886C20.4625%207.43862%2021.1681%207.86652%2024.6655%2013.3375C24.6655%2013.3375%2024.1132%205.81871%2018.8366%202.45662C17.8549%201.81477%2012.5169%201.17291%2012.7009%2010.0366Z'%20fill='%23175CCA'/%3e%3cpath%20d='M22.9786%2020.7034L17.8246%2019.2363C17.8246%2019.2363%208.65182%2030.6063%200.000549316%2026.1133C0.000549316%2026.0828%204.20348%2036.6275%2022.9786%2020.7034Z'%20fill='%23175CCA'/%3e%3cpath%20d='M23.6535%2019.7559C23.6535%2019.7559%2029.6664%2025.1352%2023.4081%2027.2136C21.8435%2027.7332%2021.1072%2028.0999%2014.5728%2028.2222C14.5728%2028.2222%2021.2913%2031.676%2026.9361%2028.9558C27.9791%2028.4362%2031.3231%2024.2183%2023.6535%2019.7559Z'%20fill='%23175CCA'/%3e%3cpath%20d='M9.17291%2022.7511L12.885%2018.9C12.885%2018.9%207.11747%205.48224%2015.1552%200.0112094C15.1858%200.0112094%203.86557%20-1.24192%209.17291%2022.7511Z'%20fill='%23175CCA'/%3e%3cpath%20d='M9.69464%2023.7898C9.69464%2023.7898%202.08645%2026.5406%203.19086%2020.061C3.46697%2018.4411%203.46696%2017.6158%206.44275%2011.8086C6.44275%2011.8086%200.215066%2016.0876%200.000318516%2022.3228C-0.0303597%2023.5453%202.14779%2028.4356%209.69464%2023.7898Z'%20fill='%23175CCA'/%3e%3cpath%20d='M39.6981%2022.8429L46.7234%207.13281H50.3128L57.3688%2022.8429H53.534L47.7665%208.96668H49.2084L43.4102%2022.8429H39.6981ZM43.1954%2019.4808L44.1771%2016.73H52.2762L53.2579%2019.4808H43.1954Z'%20fill='%23175CCA'/%3e%3cpath%20d='M61.5103%2022.8429V10.0976H56.4484V7.13281H70.1922V10.0976H65.161V22.8429H61.5103Z'%20fill='%23175CCA'/%3e%3cpath%20d='M75.8065%2022.8429H72.1558V7.13281H75.8065V22.8429ZM83.2306%2016.3938H75.5304V13.3068H83.2306V16.3938ZM82.9545%207.13281H86.6052V22.8429H82.9545V7.13281Z'%20fill='%23175CCA'/%3e%3cpath%20d='M93.9679%2019.9393H102.558V22.8429H90.3479V7.13281H102.251V10.0364H93.9679V19.9393ZM93.7225%2013.4597H101.3V16.3021H93.7225V13.4597Z'%20fill='%23175CCA'/%3e%3cpath%20d='M105.472%2022.8429V7.13281H108.479L117.774%2018.4416H116.302V7.13281H119.891V22.8429H116.885L107.558%2011.5341H109.031V22.8429H105.472Z'%20fill='%23175CCA'/%3e%3cpath%20d='M121.609%2022.8429L128.634%207.13281H132.224L139.28%2022.8429H135.445L129.677%208.96668H131.119L125.321%2022.8429H121.609ZM125.106%2019.4808L126.088%2016.73H134.187L135.169%2019.4808H125.106Z'%20fill='%23175CCA'/%3e%3cpath%20d='M145.211%2022.9232L152.294%207.09082H155.926L163.032%2022.9232H159.172L153.361%208.94547H154.814L148.979%2022.9232H145.211ZM148.752%2019.5305L149.728%2016.7486H157.901L158.9%2019.5305H148.752Z'%20fill='%23175CCA'/%3e%3cpath%20d='M165.589%2022.9232V7.09082H169.266V22.9232H165.589Z'%20fill='%23175CCA'/%3e%3c/g%3e%3cdefs%3e%3cclipPath%20id='clip0_2095_69879'%3e%3crect%20width='170'%20height='30'%20fill='white'/%3e%3c/clipPath%3e%3c/defs%3e%3c/svg%3e)
Hubspot | Athena AI Guide
To streamline your customer interactions and enhance support efficiency, follow these refined instructions to integrate the Athena AI assistant with your HubSpot account.
Step 1: Establishing the Connection in Athena AI
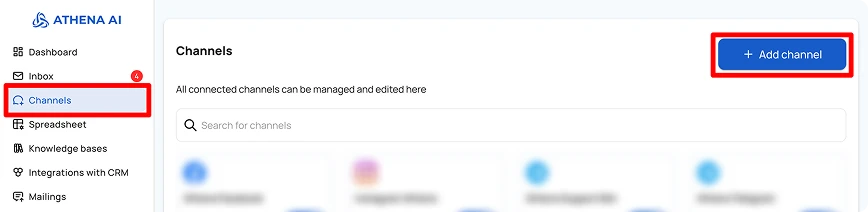
- Navigate to the "Channels" section within your Athena AI dashboard.
- Click on the "Add Channel" button to initiate the integration process.
- From the list of available channels, select "HubSpot".
- You will be prompted to log in to your HubSpot account. Enter your credentials to authenticate and authorize the connection.
Step 2: Configuring Your Athena AI Channel
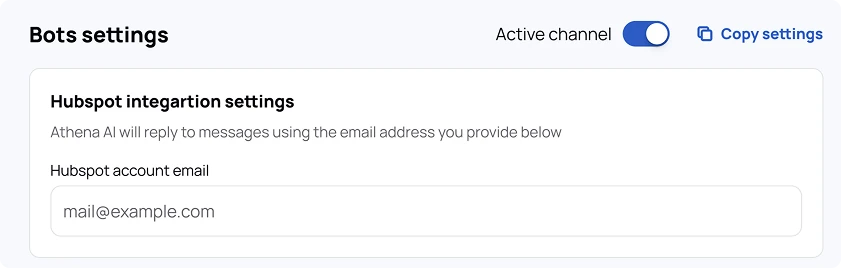
- After successful authentication, proceed to set up your Athena AI channel.
- Critical: Verify that the user account designated to respond through HubSpot is assigned the same email address that is registered within your Athena AI profile.
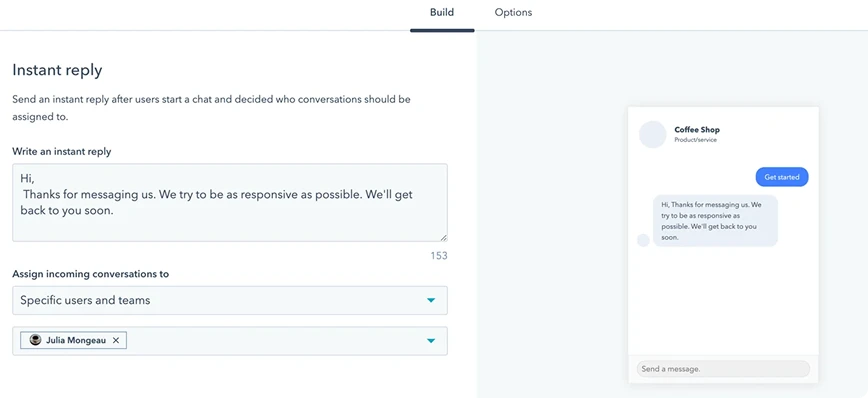
Step 3: Fine-Tuning Your HubSpot Chatflow for AI Integration
To ensure that Athena AI can effectively manage conversations, you will need to configure your HubSpot Chatflow settings.
- Access your HubSpot account and navigate to "Conversations," then select "Chatflows."
- You may either "Create a new Chatflow" or select an existing one to edit.
- Within the Chatflow setup, make the following adjustments:
- Chatflow Type: Choose "Website" and then select "Live chat."
- Inbox and Language: Select your desired inbox and ensure the language selected here matches the language configured in your Athena AI settings for consistent communication.
- Welcome Message: Customize your welcome message to greet your website visitors.
- Conversation Assignment: Under "Automatically assign conversations," choose "Specific users." From the user list, select the designated Athena AI user (this user should be linked to the email address you previously noted).
- Save your Chatflow configuration.